Maintaining clear car lenses improves visibility at night and enhances overall vehicle safety. This guide explains a practical, step-by-step method to restore clarity using tools and materials commonly found in headlight restoration kits and related products.
Follow these steps to remove haze, yellowing, and minor scratches from polycarbonate lenses, while preserving the integrity of your headlights and avoiding common pitfalls.
Quick Answer
Use a dedicated headlight restoration kit or a car headlight polishing compound kit to remove oxidation, then finish with sanding discs designed for polycarbonate lenses and a microfiber cloth bundle for a smooth, clear shine. Avoid harsh household cleaners and test any product on a small area first.
What You’ll Need
- Headlight restoration kit
- Car headlight polishing compound kit
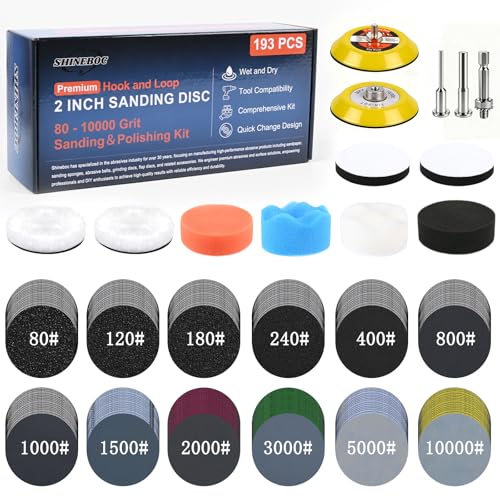
- Drill-powered headlight restoration kit sanding discs
- Headlight polish and microfiber cloth bundle
- Polycarbonate headlight sanding discs for restoration


Before You Start
Inspect lenses for deep cracks or deep pits that may require replacement. Work in a shaded, well-ventilated area and protect surrounding paint with masking tape. Use low speeds on drills to prevent heat buildup that could warp the lens. Time estimate: 30–60 minutes per pair, depending on haze severity. Wear eye protection and gloves to minimize skin irritation from sanding dust.
Step-By-Step: How To Clean Car Lenses
- Prepare the area: Clean the lens surface with a mild soap and water solution to remove surface dirt.
- Mask the surrounding area on both headlights to protect paint and trim.
- Begin with the coarsest sanding disc included in your polycarbonate headlight sanding discs for restoration kit, gently applying even pressure in a circular motion.
- Wipe away residue with a microfiber cloth, inspecting for remaining haze or oxidation.
- Progress through finer sanding discs to gradually refine the surface until it feels smooth to the touch.
- Apply the headlight polishing compound kit or headlight polish and microfiber cloth bundle, working the polish into the lens until a clear shine forms.
- Buff with a clean microfiber cloth to remove any remaining residue and check for uniform clarity.
- Repeat the polishing step if necessary, then seal the lens with a protective UV sealant if your kit includes one.
- Re-clean the area and remove masking tape to reveal brighter, clearer headlights.
- Test night-time visibility by turning on low beam headlights and ensuring the light pattern is crisp and uniform.
- Document the results and store any leftover discs and compounds in a cool, dry place for future use.
- Dispose of used sanding discs and waste according to local guidelines and keep children and pets away from the work area during finishing steps.
Troubleshooting
| Symptom | Likely Cause | Fix | Prevention |
|---|---|---|---|
| Headlights still look hazy after polishing | Inadequate sanding or deep oxidation | Repeat with finer discs and ensure thorough cleaning between steps | Regular maintenance to reduce oxidation buildup |
| Polish residue wipes off unevenly | Uneven application or insufficient removal of old material | Reapply polish in a consistent motion and wipe clean with microfiber | Use fresh cloths for best results |
| Scratches reappear after a few days | Low-quality discs or insufficient sealing | Invest in higher-quality sanding discs and apply UV sealant | Protect from UV exposure when parked in sun |
| Headlight lens cracks during process | Excessive downward pressure or overheating | Use lighter pressure and cooler, intermittent sanding | Follow kit instructions precisely |
Common Mistakes
- Using harsh household cleaners that damage polycarbonate
- Skipping masking and allowing debris to contact adjacent paint
- Rushing through steps or skipping finer sanding stages
- Not applying UV protection after polishing, accelerating haze return
These missteps can negate the benefits of a restoration and may require redoing the process.
Tips For Best Results
- Work in small sections to maintain control and prevent overheating
- Keep sanding discs clean to avoid embedding debris into the lens
- Use a consistent pressure and speed, especially during polishing phases
- Finish with a UV sealant or protective coating to prolong clarity
- Periodic maintenance can extend the life of the restoration
Call A Professional
Seek professional help if there are deep cracks, significant clouding beyond cosmetic oxidation, or if the headlights are not aligning properly after restoration. Do not attempt drastic structural repairs at home and consult a technician when uncertain about the lens condition or safety implications.
FAQ
Can I use household toothpaste to clean car lenses?
Toothpaste is not designed for UV protection or polycarbonate restoration and may cause micro-scratches or uneven results. Use dedicated headlight restoration products instead.
How long does a typical headlight restoration last?
Results vary, but with proper sealing and care, restored lenses can stay clear for several months to a year depending on exposure and climate conditions.
Is a drill necessary for restoration?
Many kits provide drill-powered sanding discs that speed up the process, but hand-sanding can work for smaller jobs. Follow the kit instructions for best results.
Will restoration improve daytime visibility?
Yes. Clearer lenses reduce glare and improve the perceived brightness of headlights, aiding nighttime visibility.
Buying Guide
When choosing gear for cleaning car lenses, consider size, noise, energy use, and control features. A versatile headlight restoration kit with adjustable sanding stages and a reliable polishing compound often provides best value for the garage. Look for a kit that includes durable polycarbonate headlight sanding discs and a microfiber cloth bundle for finishing. Noise levels during drill-assisted work are a practical factor if you perform restorations in a shared space. Compare kits based on included accessories, replacement parts, and compatibility with your vehicle’s lens material. Consider whether you want a sealed UV-protective finish and if the kit supplies clear instructions or video tutorials. For frequent use, choose a bundle that minimizes separate purchases and ensures consistent results across both headlights. Remember to verify the product keywords align with the items you plan to buy, such as a headlight restoration kit and related accessories. Are you ready to pick the package that fits your vehicle and your workflow? The right combination can simplify maintenance and keep headlights clear for longer.